|
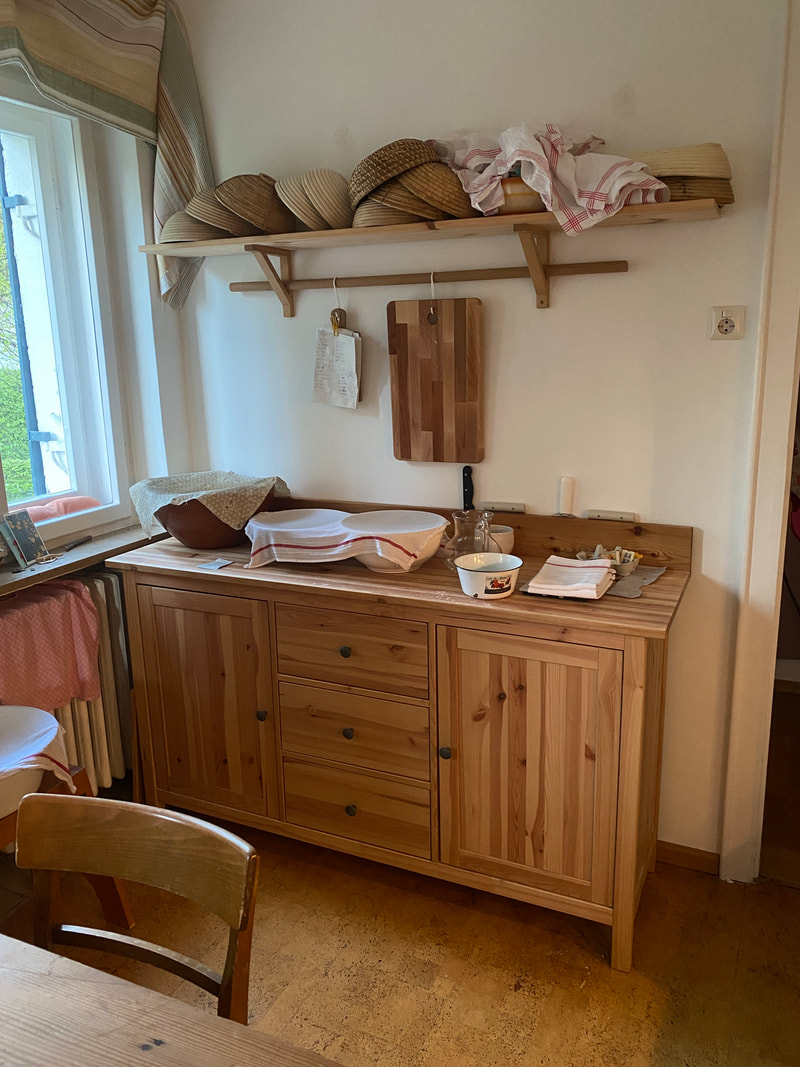
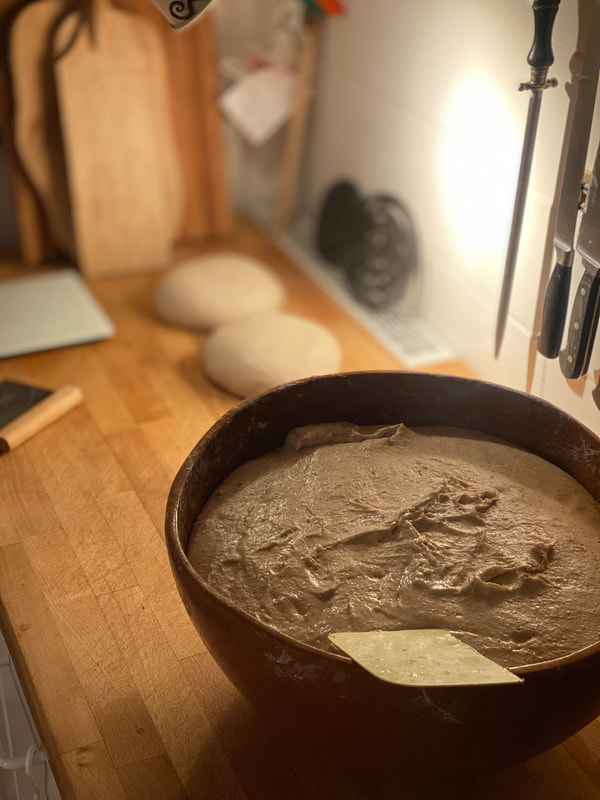
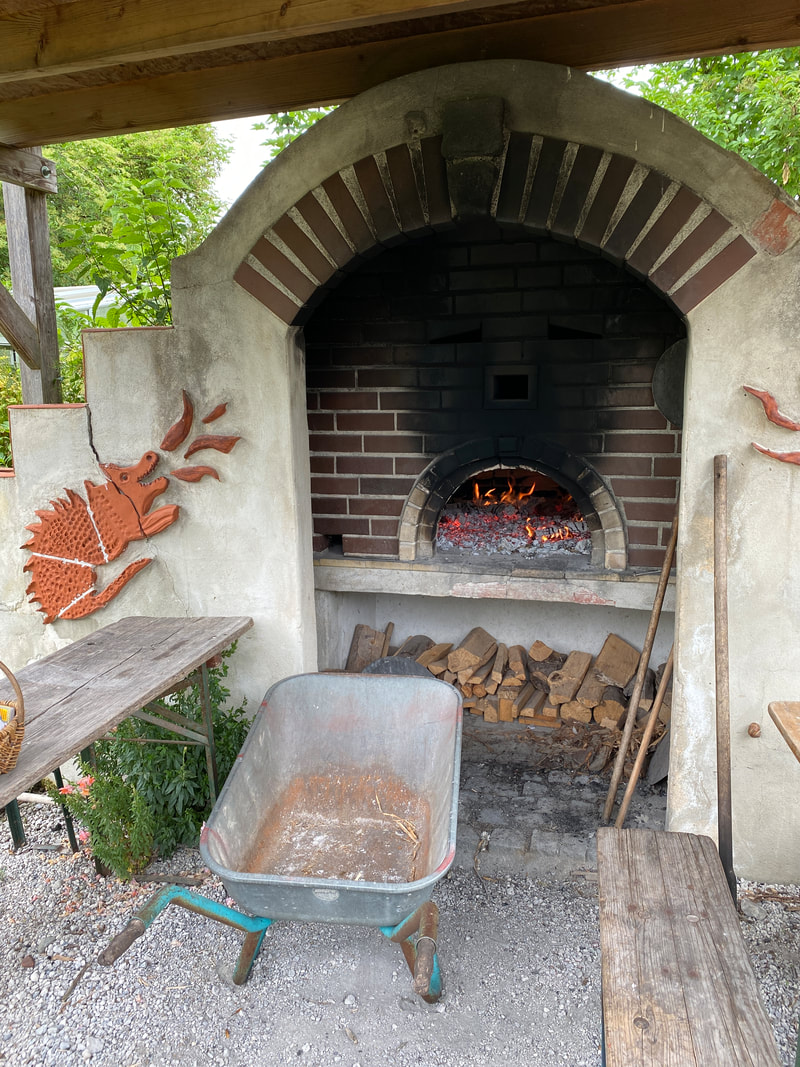
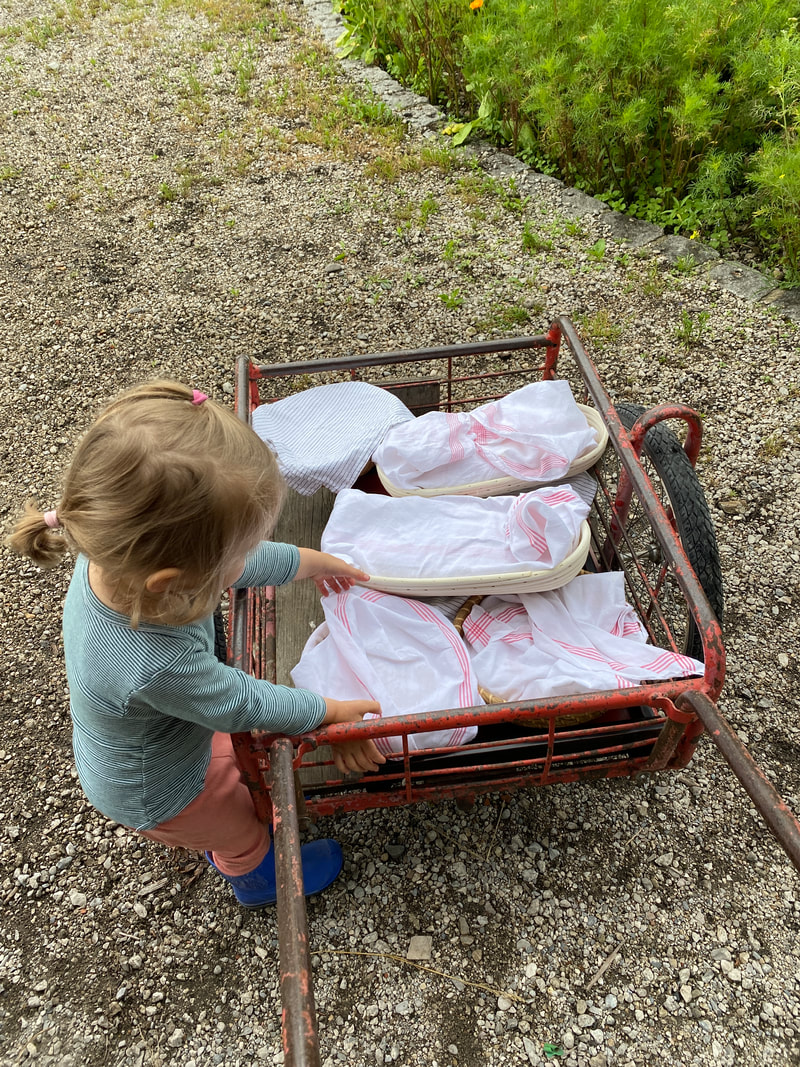
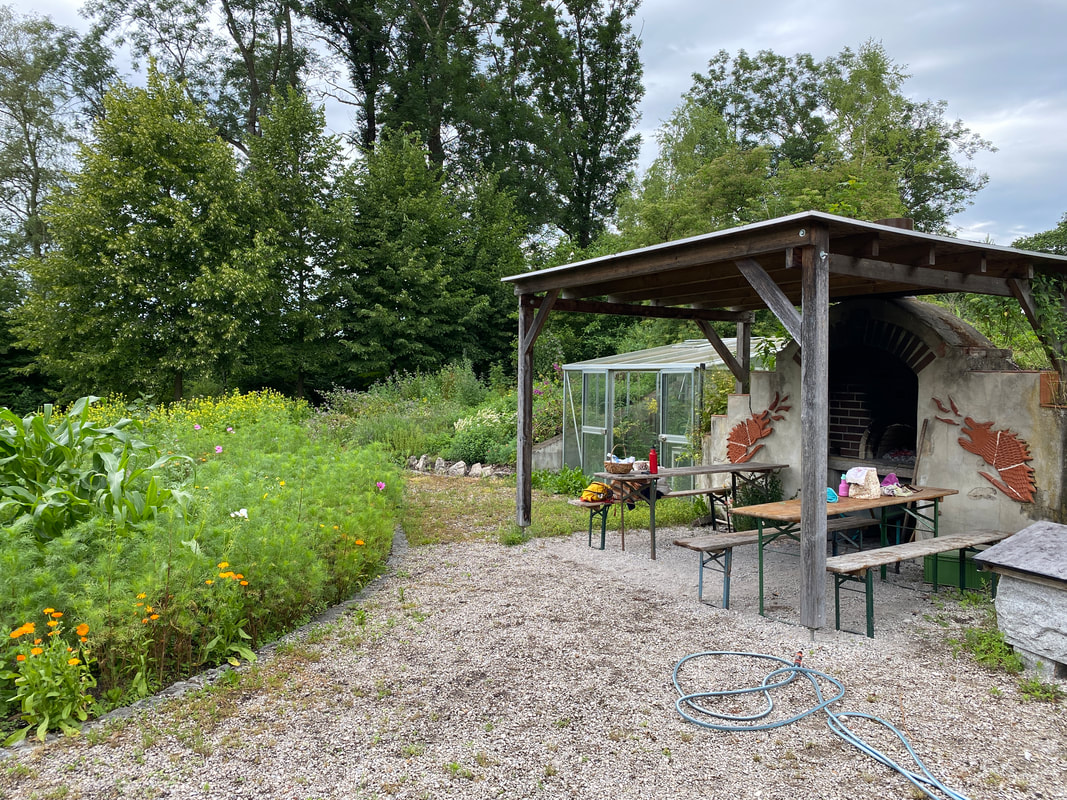
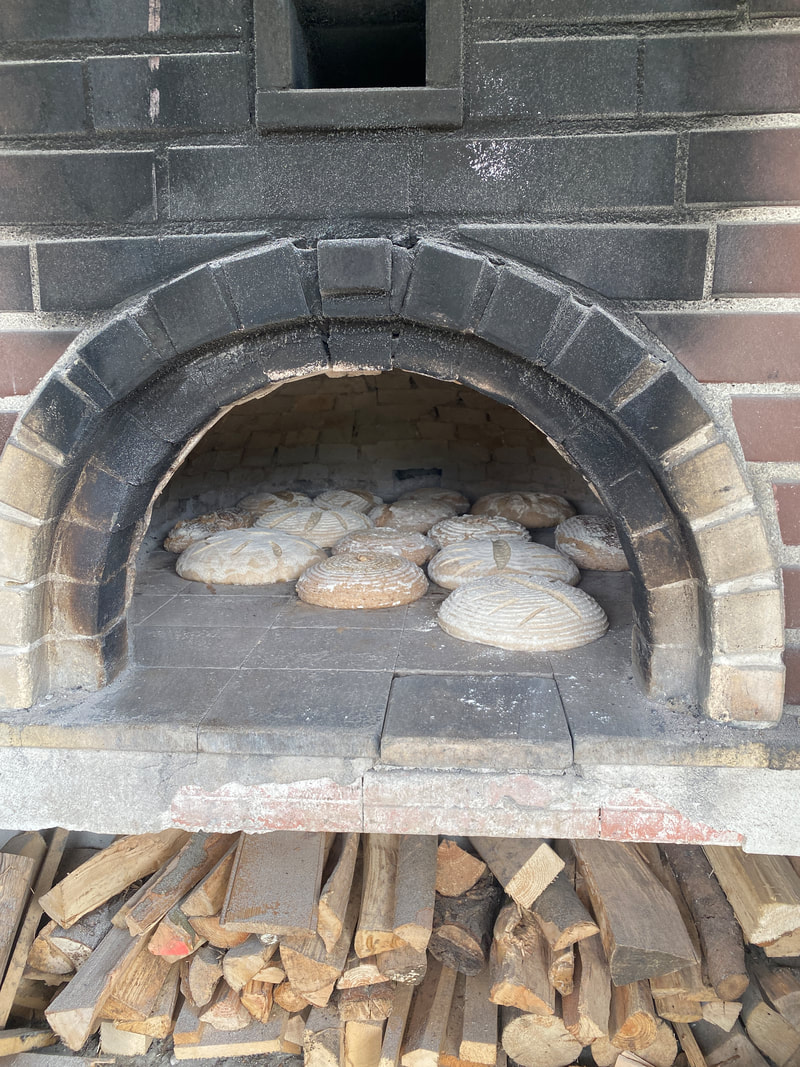
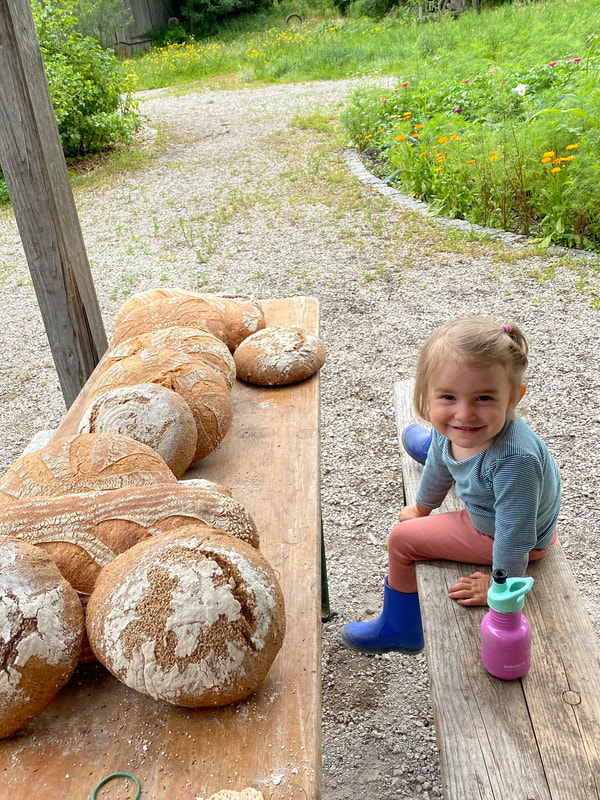
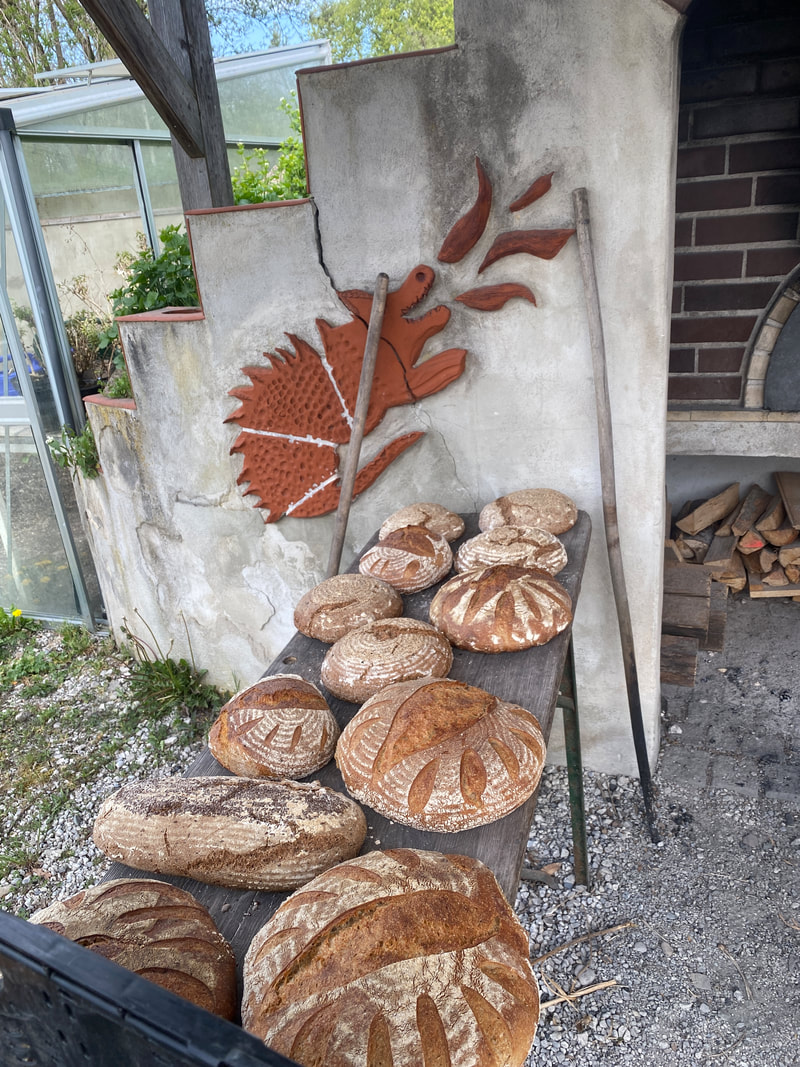
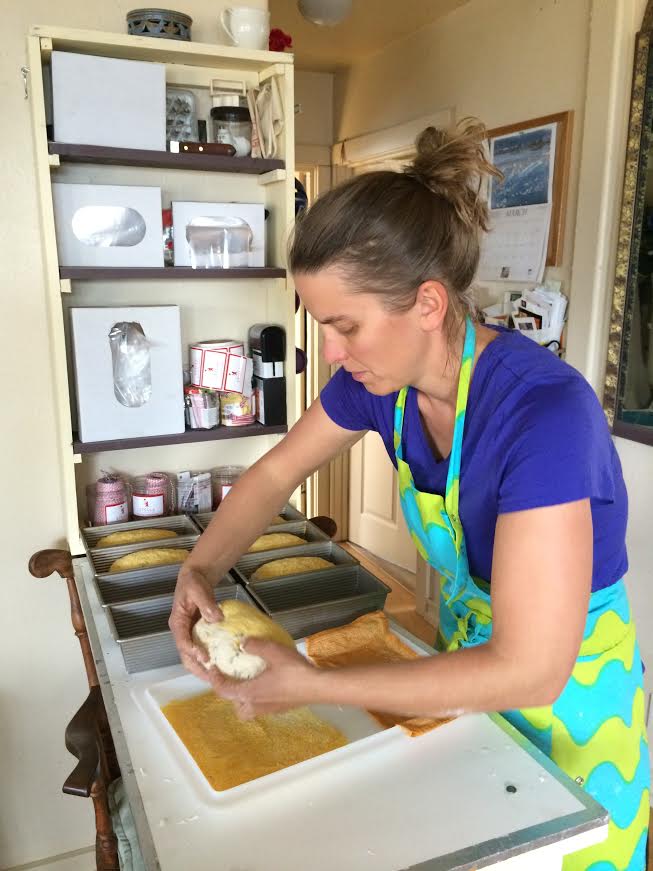
It has been a long time since I wrote anything on here, so I thought I could give you a bit of a glimpse into what's happening right now. We are still in Germany. I have been baking a few loaves a week in our home oven for us to eat. But a couple months ago I got invited to use the wood fired oven on the farm where Finely goes to kindergarten. So Tenaya and I have spent a few mornings there now, firing the oven and baking bread for us to eat and some to sell at the farm store. It has been fun! I set up a small baking table in our kitchen and am back to making 12 loaves instead of 120. It reminds me of how I started. The place is beautiful and so peaceful with a creek running by. Tenaya loves to play with a little girl her age that lives on the property and they can roam while I watch the oven. We will be in Bozeman for the summer, but will return to Germany for the school year and I hope to be able to bake on a regular basis starting in the fall. Lots to learn with the wood fired oven, and the different flours and grains and the loaves aren't nearly as pretty as they were back in Bozeman but it is so satisfying to bake again. I sure missed it!
0 Comments
 This past week I have been craving egg salad. The first time I ever made egg salad was with my American Grandpa as a little kid. It was one of the few dishes that we both agreed on and I loved making it with him. He would use a ton of mayonnaise and buy the squishy wonder bread that I had never seen before and even as a kid didn’t consider bread. I have always liked it on dark German Rye. Now, I use veganese, capers and coarse dijon mustard in my egg salad, but it still filled with fond memories of my Grandpa. Enjoy it on a slice of toasted German Rye for a satisfying winter lunch!
Egg Salad with Capers
Boil your eggs and cool them off well before peeling and cutting into a medium size bowl. Add the veganese, mustard, salt and pepper. Chop the capers and add to the bowl. Stir it all together and scoop onto a slice of toasted German Rye for a wonderful satisfying and quick lunch. I find that the addition of the coarse mustard gives this egg salad a nice texture and the capers add that extra bit of green saltiness that egg salad calls for in my opinion, my Grandpa would probably disagree.  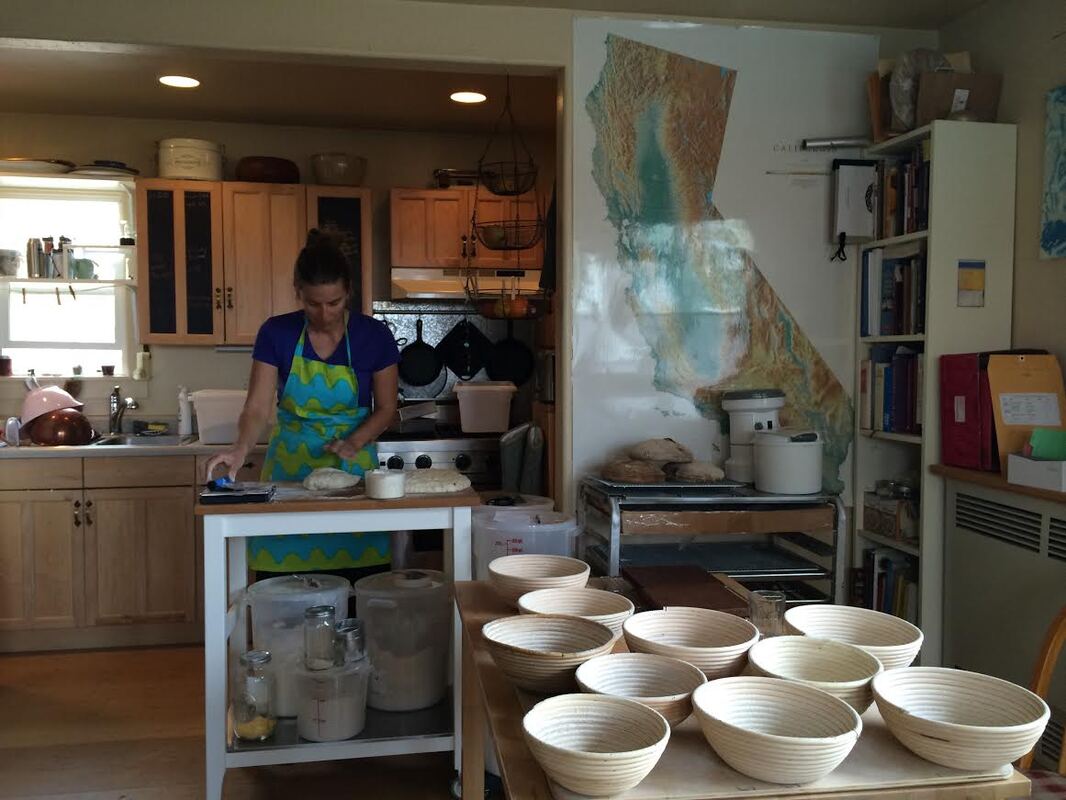
10 years ago this month, I finished my last season as a field biologist studying song birds in the Eastern Sierra, CA. I had gradually made my seasonal field work into a year around job that put me in front of a computer a lot more than I ever wanted to be. I finally had a secure job, monthly income, a 401K and some savings but I was pretty unhappy sitting at a desk. It was time to quit. My husband and I decided to celebrate this new phase in life by hiking the John Muir trail south to north. We started at Whitney Portal and summited the highest peak in the lower 48 as the start of our journey to walk back home to the Mono Basin. It was a magical fall adventure that set the tone for everything to come. The Sierra is my mountain range where I feel most at home and spending almost a month in the high country made my heart sing and I was ready to think about new ideas. During this transitional time while moving through high granite landscapes living so simply, I was reminded that I needed to do physical work and not sit at a desk.
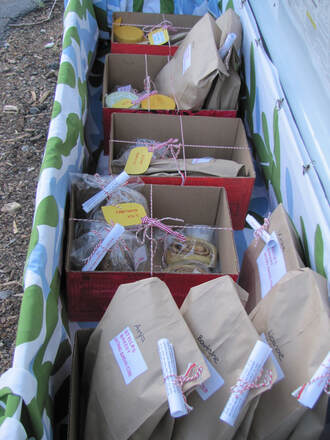
All summer I had been looking into pastry programs in France and on the East Coast, thinking that was where I wanted to go, but the price tag was scary and the advice I was getting was to not do that unless I had a lot of funds. One day our homesteading farmer friend was dropping off our CSA share and he gave me the idea of just staying in the Mono Basin and baking for the people of the tiny town of Lee Vining and making my own Community Supported Bakery. The idea was perfect and so it all began... STELLA's Community Supported Bakery was born. Things started off with a cake, dessert and bread option and I had 12 people sign up for a month! I couldn't believe anyone would trust their bird biologist with baking their food, but they did. Thank you! One day our ranger friend came by and brought his sourdough starter and we made some bread together. It was the best bread I had ever made at home. I totally fell in love it right then and there. It was my medium to express myself to be creative and to really work with my hands. Even though I thought pastry would be my field I now wonder why I thought that. My sister told me it made so much more sense I loved bread and not pastries comparing it to my painting days where I was the one needing big sheets of paper and lots of expressionistic colors and textures, not fine pencil drawings with all the details of a pastry, but instead capturing the overall feel and basics of the scene. Three years of working out of our 300 square foot cabin and many bakery shares later we made our move to Bozeman and increased my baking ten fold the first summer, still baking out of a regular home oven. Finally in 2017 I was able to buy a used deck oven where I could bake 24 loaves at a time and have a button that would bring in the steam! It was an amazing feeling! Since then I have had two kids and baking has nearly come to a stand still but when I do get a chance to get into the flow of baking bread I fall in love with it over and over again. I never get tired of the smell and the feel of the dough and cutting into the first loaf out of the oven with my kids is as rewarding as I can imagine any work ever being. 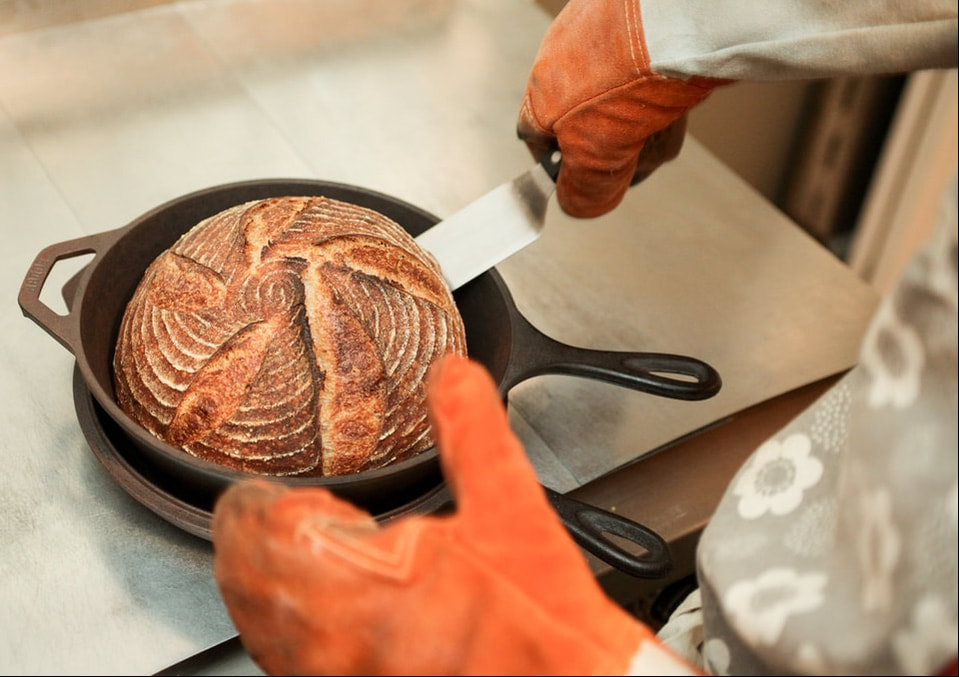 You can bake bread with very few things but here is a list of tools that I find very useful and that will help you elevate your home baking. Below is my list with links to as many independent stores as possible, so if you are getting started try to support other small and local businesses during these trying time for so many.
I made the list in the order of importance to me and my baking at home: TOOLS Scale I already talked about this in my sourdough starter post. Just get one if you want to bake. Metal Dough Scraper I can't recommend this enough. Moving your dough around and scraping your counters will become so much easier. No more sticky mess that you don't know how to get off. Combo Cooker If you want to make free form loaves like a boule this is absolutely key for home baking! I used to bake with four of them in my home oven when I first started to sell bread, it makes a beautiful crust! If you want to invest some more Challenger Bread Wear makes a bread specific one that would allow you to make Demi baguettes and batards as well. Thermometer It will help you get more consistent results Banneton A bowl will do but if you bake often you won't regret having one of these beautiful baskets Bread Pan I always recommend having one of these on hand. If something went wrong with your dough and it's sticking everywhere you can just plop it in a pan and the bread will still taste good! And most people prefer their sandwiches in this shape anyways. Plastic Bowl Scraper Makes cleanup so much easier Plastic Tub I find that a. plastic tub with lid does a better job at keeping the dough at a good temperature and it doesn't let it dry out as much. Lame You can use a regular knife but this does a much nicer job 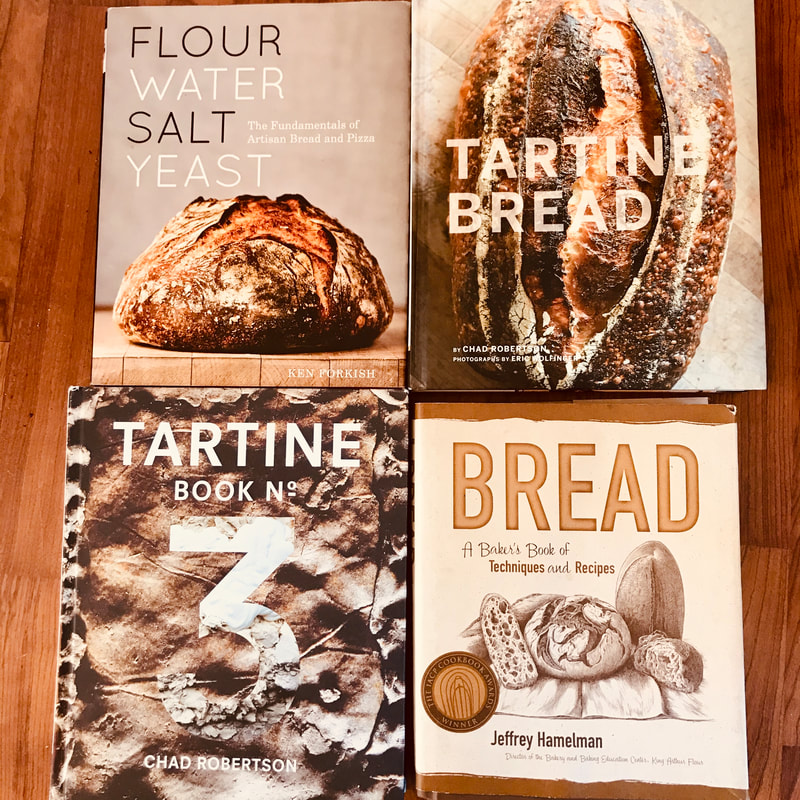 Now that you have your sourdough starter and are ready to bake, here are some resources that I have found helpful. Everyone has a different way of learning but I mostly taught myself through books. Later on I watched more YouTube videos and those are super helpful to visually see what certain terms mean. I won't write down any specific recipes here, there are so many out there! See below for website recommendations to get started right away.
BOOKS Tartine Bread Book by Chad Robertson This is the book that got me started. It is great if you like to understand the whole process and like to dive in. You could say this is a whole book about one type of bread. Tartine #3 by Chad Robertson This one I like for ideas on what you can add to your basic Country loaf, using more whole grains and cooked grains. Flour Water Salt and Yeast by Ken Forkish This book gives you great bake schedules. Thanks to Ken Forkish I didn't need to wake up in the middle of the night to bake/ feed/ stretch and fold what ever it was that I didn't anticipate to happen at that time of day. His overnight pizza recipe is also my go to. Bread by Jeffrey Hamelman The classic resource. It's where I go to trouble shoot or dive deeper on understanding some part of the process. Baking for Beginners by Bonnie O'hara This book was published after I already learned to bake, but Bonnie does an excellent job at making bread baking available to complete beginners. Her instructions are clear and she is unpretentious. She has an online class as well, see details below. Her book starts with yeasted breads and walks you through to sourdough loaves. It is very unpretentious. ONLINE RESOURCES The Perfect Loaf all the resources you need for sourdough baking. Fantastic recipes, explanations of processes etc. Maurizio does an amazing job at explaining all about sourdough in a very accessible and easy to understand way. Alchemy Bread Bonnie has a lovely beginners online course. It follows the first chapters of her book. Her calm voice guides you though all the simple steps that we tend to overlook once you have been baking for awhile. This is not sourdough specific but she shows you how to scale, mix, fold, judge the rise and bake your bread. The Fresh Loaf A community for amateur artisan bakers and bread enthusiasts, a great site to search for all sorts of ideas and find answers to your questions. Hope these resources are helpful to you! There are a million more things out there that are useful and I am sure you will find what is most useful to you. In the next post I will tell you about all the tools I like to use. 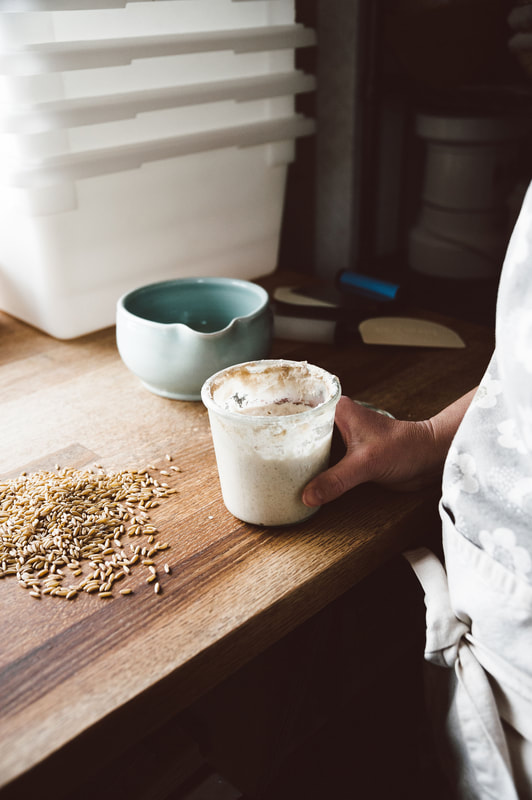 The first thing to remember is that keeping your sourdough starter alive is not complicated or hard. All it takes is a little commitment and a willingness to trust your senses. You will find your own rhythm with it all and it will be so rewarding.
There are some amazing resources out there about how to maintain your starter. I will write down what I do below, but I won't go all out in explaining too much since there are some wonderful resources out there already. My favorite online description is probably Maurizio's from the Perfect Loaf, great detail with pictures etc. His site is an incredible resource for bakers of various skill levels for all things sourdough. Keep in mind that all these are just guidelines and ideas and things that work for me and others. But as you get to know your sourdough starter you will find your own rhythm with it all. It might sound like a lot at once, but it won't feel like that in a few days! I got my starter from a backcountry ranger, if he can keep a starter alive so can you! One thing I highly recommend: A simple digital scale. If you have not converted to using a digital scale in the kitchen, do it now! It is $30 well spent. It took me years of convincing my mom to get a digital scale and now she thanks me for it all the time! It makes baking 100% easier. A note on water: If you have city water here in Bozeman or anywhere else it has chlorine, I highly recommend you filter your water. My starter almost died when we first moved here due to the chlorine. Even letting a jug sit out overnight will help tremendously in reducing the amount of chlorine since it will evaporate, Below I will walk you through what I do if I want to bake 2 loaves on Wednesday: Monday 9am (First Feeding) I take my jar of starter out of the fridge and place it on the scale. It usually smells pretty sour at this point. I know how much my jar weighs (I write it on the bottom), and you should too, so all I do now is reduce the starter to 100g. Next I add 40g of room temperature water (~78F) and stir it all up. Then I add 60g of Type 85 flour and stir it until there is no loose flour left. Now I have 200g of starter in my jar. I put the glass lid on and let the jar sit on the counter. Monday 3pm (Second Feeding) At this point my starter will have doubled in size and will smell sweet-sour like yogurt. I will discard enough starter so I have 100g left in the jar. Then I will add 50g of water (78F), stir it all up and 50g of Type 85 flour and stir again. Monday 9pm (Third Feeding) At this point my starter will have doubled in size again and will smell sweet-sour like yogurt. I will discard enough starter again so I have 100g left in the jar. Then I will add 50g of water (65F), stir it all up and 50g of Type 85 flour and stir again. Put the lid back on and leave it on the counter overnight. If your recipe calls for more than 150g of starter this is the time you can adjust how much you feed your starter to what you need tomorrow. The Weck Jar fits just over 200g, so change it to a bowl if you need more. I often get asked if you can avoid any of these steps and of course you can. But I have found that if I don't feed my starter two or three times before using it, there is not enough strength in it to make beautiful bread. I think of the discard as digested food for my starter and I have done it here so it is minimal. Tuesday 6am (Last feeding before it goes back in the fridge) Take out as much starter as you need for your bread and leave 50g starter in your jar. Add 20g of water to the jar, stir, add 30g of Type 85 flour to your jar, stir, cover and place it in the fridge for your next baking day! Mix your bread following any of the amazing recipes out there. I will write another post with all my favorite resources for this. Have fun with it!! Even if you neglect your starter and it looks gross and grey, don't despair, it will just need a little extra love and attention and more feedings before it is ready to use for baking. Happy Baking!! |